by Stacey Cogswell, Independent Stampin'Up Demonstrator

Monday, January 6, 2020


My January stamp camp is coming up on the 24th and 25th. We will be making all these fun "love" themed projects, but they are not all for Valentine's Day. They can be used for a birthday or friendship giving.  

The cost of the stamp camp is $20 or Free with a $35.00 order, but wait I've got a deal for you. With every $50 order, you'll receive a Free $8.00 or less embellishment of your choice. Plus, because it's Sale-a-bration, you'll also receive a Free SAB item and as always you will also earn one Loyalty
token for every $50 order.

Space is limited so please contact me today!

Have a great day!
Stacey


It's time to start Sale-a-brating!
That's right it's Sale-a-bration time!
For every $50 order, you'll get to pick a free item from this fun packed little catalog!
If you need one of these catalogs, please let me know.


Monday, October 21, 2019

24 Hour Flash Sale is Comimg!


October 23 is the big day! For 24-HOURS ONLY, you and your can save 15% on select stamp sets. This sale will be over at midnight, so check out the list, click the "shop" button  and get excited about your savings! 

Tuesday, October 8, 2019

Breast Cancer Awareness Month Bra Card

Created by Stacey Cogswell
Copyright Stampin'Up!

Here is the original post that was posted yesterday: 

For over the past 30 years I have preformed 1000's of mammograms. I've been there to comfort women (and men) when they were scared and confused. I've held their hands during biopsies and prayed that all would have good results, but as we all know, this isn't always the case. I pray for a day when we find a cure for not just breast cancer, but all cancer. So, in honor of Breast Cancer Awareness month, I made this card using the Snow Globe Shaker Domes.
WOW....Over 1700 comments or likes. I've had such an overwhelming out pouring of love over this card when I posted it on the Stampin'Up! Demonstrator Website. I feel so blessed to be part of this community! Thank you all for you kind words and willingness to share your stories. All of you are amazing women and all of you are in my prayers. I will do my best to show you how I made this card and hope it inspires you to make one too!

To make this card you'll need:

Snow Globe Scenes Dies
Hold to Hope stamp set
Bog Shot 
Subtle embossing folder
Two 2 1/2" circles (either punched or die cut) and a 3/4" x 4 1/2" strip (may need trimmed down)
Lovely Lipstick cardstock  base: 4 3/4" x 6 1/4" plus a small piece for behind greeting
Whisper White cardstock:  4 1/2"x 9" score at 4 1/2" This is the part of the card that opens.
Petal Pink cardstock: 4 1/2" x 5 1/2" (may need trimmed slightly) plus a piece to cover behind domes and a piece for the greeting.
Black 3/8" Scalloped Edge Ribbon
Lovely Lipstick 1/8" ribbon and a small brad
Glue dots

Cut the two Snow Globe Dome openings on the Petal Pink cardstock leaving about 1/2" between the domes in the middle. (Sorry, I can't show you this step by step as I borrowed the Snow Globe Scenes Dies from a friend and have already returned them.)


Adhere the Snow Globe Domes inside the die cut holes. Cut around the edges of the snow globes to create a "waist". I did cut off a little bit of the snow globe adhesive edges on the sides.  Adhere a piece of Petal Pink cardstock behind the dome openings. This piece can now be added to the front of the folded Whisper White card, then to the Lovely Lipstick matte.

To create the Bra:

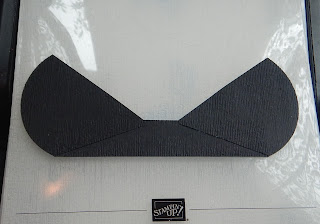
Cut the 2 1/2" circles like in the picture.  


Lay the two cut circles and strip on the domes to get an idea of placement. Adhere the two cut circles to the 3/4" strip. I used white card stock to give you an idea of how it should look. You may need to trim a little of the strip off the strip.


Run your "bra" though the Big Shot using the Subtle Embossing Folder. This really makes it look like fabric.


Cut two 5" pieces of the ribbon and fold them in half. Using glue dots, add to top of bra as straps. On the back add tear tape.


Adhere ribbon around the edges of the bra allowing only the scalloped edge to show on the front. Trim ribbon to match contour of bra on the bottom.


Create a Breast Caner Awareness ribbon using a 2 1/2" of Lovely Lipstick ribbon. Attach to the bra using a small brad. Using glue dots, adhere bra to front of card and snow globe domes.  Stamp greeting and add to front of card with dimentionals.

Created by Stacey Cogswell
Copyright Stampin'Up!


I hope these instruction make sense and are helpful for you. Thank you again for all you kind words about this project. Breast Cancer Awareness is very close to my heart and I pray that some day breast cancer will be a thing of the past.

Smiles,
Stacey


Tuesday, September 24, 2019


These amazing products will be available on November 1st, but why wait! Join my team today and you'll be about pre-order all these products on October 1st! Contact me today for more details.

Tuesday, September 17, 2019

Clearance Rack


Tons of new items on the Clearance Rack.
Go check it out!
Click on the "Order Stampin'Up! products from me"
over on the right side bar....really go check it out!

If I get enough people wanting to place an order, 
we can share the postage.


Monday, September 9, 2019

Double Z Fold card

Created by Stacey Cogswell
Copyright Stampin'Up!
Created by Stacey Cogswell
Copyright Stampin'Up!


I had several requests for the direction on how to make this card, but I'm not that good at making clear instructions, so here goes....

These will just be general instructions, I'll let you pick card stock colors and DSP.  

Card base: 4 1/4" x 11" score at 2 3/4" x 5 1/2"

Top card: 3 1/2" x 9" score at 4 1/2"  (You can also make this section a little smaller to give you more room on the front if you want to tuck the top card under a punched embellishment, just adjust the DSP and white Vanilla pieces.) You will need two pieces of white or vanilla CS 3 1/4" x 4 1/4" to place on the inside and outside of this top card piece.

Middle section of card base White or Vanilla CS 2 1/2" x 4"
First section of case base: DSP 2 1/2" x 4"

DSP for gift holder 3 1/4" x 4 1/4" punched at the top with a 2 1/2" circle punch.

DSP strip for inside top card (below the middle stamped area) 1 x 3 1/4" 

Fold card base on the score line, creating a z fold. Fold top card in half and adhere to the largest section on the base piece. Add white or vanilla stamped pieces to the front and inside. Add DSP strip to the middle section.  Decorate/stamp front of card as desired.

Hope this make since, if not let me know. 

Smiles,
Stacey